[RE: nyman]#_

don't let perfect be the enemy of bad

Recent Posts

Persistent login to OpenWRT luci

published on

Sometimes, if you are logging in multiple times per day, the default 1 hour session time tied to a browser tab/window might be a bit annoying.

To increase the session time to for example 1 month 24 days1, you need to do

uci set luci.sauth.sessiontime=2147483
uci commit

But it’s still set as a session cookie, to fix that, you need to modify /usr/lib/lua/luci/dispatcher.lua and change the line which begins with http.header("Set-Cookie",. You need to insert Max-Age= to make it a persistent cookie. Like so

http.header("Set-Cookie", 'sysauth=%s; Max-Age=2629746; path=%s; SameSite=Strict; HttpOnly%s' %{

Then you need to clear the luci-modulecache or reboot

rm -rf /tmp/luci-modulecache/

There, if you re-login on to luci you should now have a persistent cookie which will persist for one month. To remove it, press the logout.


  1. Update 2021-06-12: After locking myself out I figured that on a 32 bit system you can’t set this to anything higher than a 32 bit signed integer, this seems to be a ubus limitation [return]

Backing up you VM with borg

published on

Recently, for no specific reason at all I did a review of my backup plans of my tiny personal VM:s I have.

Octave Klaba tweeting about the fire at OVH

As my disaster recover plan was mostly “I hope they don’t lose it all at once” I decided to upgrade it to “I have some backups, so I don’t lose it all at once”.

To keep things simple and as I love micro optimising to see for how cheap I can get my personal VM’s, I decided to use my home NAS for backups instead of just paying for third-party storage like B2.

So, here are a rough1 overview of how you can use a local Linux NAS as destination for backing up a cloud VM.

Turris Omnia

First we need2 to get borg working on the turris. Luckily the Turris has lxc, so we can just spin up an alpine instance and do apk add borgbackup and apk add openssh-server. Then update the network to none to share the host network and mount any disk you want.

# first comment out any other network
lxc.net.0.type = none
# bind-mount /mnt/sdb2/dir
lxc.mount.entry = /mnt/sdb2/mydir /mnt/sdb2/lxc/borg/rootfs/mnt/mydir rw,bind 0,0

I decided to use a separate ssh inside the lxc for a bit of additional sandboxing.

Add the following to authorized_keys to allow the server you want to back up to run borg, but nothing else.

command="borg serve --restrict-to-path /mnt/server-bakups",no-port-forwarding,no-agent-forwarding,no-pty,no-X11-forwarding ssh-rsa AAA...

C1 Server

Time to start backing up, first because C1 is an armv7 instance, download arm binaries from https://borg.bauerj.eu.

Then check that you can connect to your Turris and get some borg output back from the limited ssh-key. Similar to below.

a example of borg backup output

If that works you can initialise the repository and start backing up according to the borg instructions

Something like this

borg init -e=repokey ssh://root@100.127.112.32:40022/mnt/mydir/myserver

and if that works

borg create ssh://root@100.127.112.32:40022/mnt/server-bakups/personal::{hostname}-{user}-{now} /home /etc /var/log

And if that works, then either call it a day or address the obvious issues like running the receiving borg as root :-)


  1. This is a very rough guide, it will not work without modifications so don’t try to just blindly copy and paste the instructions. These instructions are specific for Turris Omnia with tailscale and a Scaleway C1. [return]
  2. you can probably ignore this or restrict ssh some other way, but I did this because I started out from the other direction, trying to get borg running on the NAS, and it would then reach out to the servers. [return]

Conditional access using only nginx

published on

Have you ever wanted to deploy a website to test that it works, without everyone else being able to see it?

If you are using a dynamic language or CMS for your webpage (PHP, Wordpress or Ruby on Rails) there are straightforward ways to accomplish this.

But what happens if you have a static webpage? Here I will present one solution using only a nginx config file to accomplish this.

# first we need to allow access to the soon.html
# and also a logo which is linked from the soon.html
# if your soon.html links more resources in this server
# you need to update the regex to match that also
location ~ /(soon\.html|images/logo_white.png) {
    try_files $uri =404;
}

# this is the secret way to get past the block
# it will set a magic cookie with a lifetime of 1 month
# and redirect back to the host  
location /iwanttobelieve {
  add_header Set-Cookie "iwantto=believe;Domain=$host;Path=/;Max-Age=2629746";
  return 302 $scheme://$host;
}

# this is the normal serve, but with a condition that everything
# everyone that does NOT have the magic cookie set will be served
# the content of soon.html
location / {
if ($http_cookie !~* "iwantto=believe") {rewrite ^ /soon.html last; }
	try_files $uri $uri/ =404;
}

That it! Copy and paste the above into a server {} block. Make sure to take not of the order though to ensure you don’t have anything else before this which would take precedence. Then change all occurrences of soon.html if you use something else. And remember that the first match needs to match everything that this soon.html tries to reference, otherwise they will just get back the content of /soon.html for all other requests.

Note that if is a bit finicky in nginx, check their documentation for more details.

Usability > Security

published on

Introduction

The other day I wanted to use my noscript.it with one of my old iPhone 4S running iOS 6, but I was met with “could not establish a secure connection to the server”.

Screenshot of safari showing error Turns out it was because I had, out of habit, configured the server with a “modern” list of TLS ciphers. And the poor old iOS 6 didn’t support any of them.
So, I went on a mission to ensure noscript.it works with as old devices as possible.

It turns out enabling TLS1 and TLS1.1 on Ubuntu 20.04 is a bit harder than I expected1. Luckily someone else solved it already.

So now, after using the old mozilla SSL config and appending @SECLEVEL=1, it works. Even on my vintage iPhone 3G. Hurray!

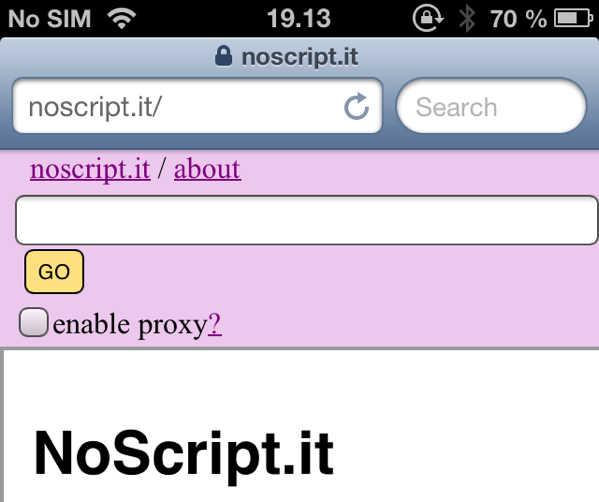
Screenshot of NoScript on iPhone 4S

Wait what?

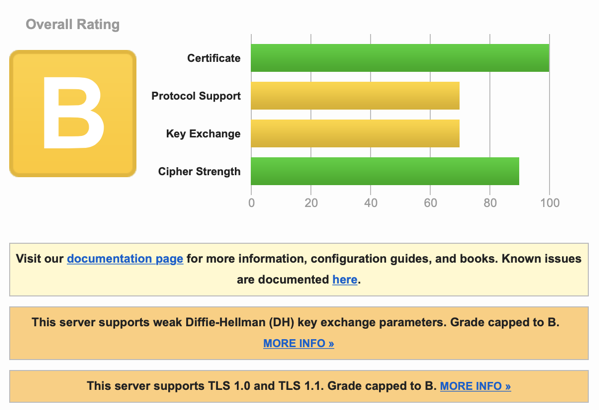
But, I hear you say, isn’t this less secure? I mean now you only get a B on the Qualys SSL Report! Clearly this is bad!?

Screenshot of Qualys SSL resultsLet’s take a step back and think about what the score actually means. noscript.it automatically gets a B because it supports TLS1. But let’s go one step further and assume we’re looking a bank with a C2. A site gets a C if it supports SSLv3, meaning it is vulnerable to the SSLv3 POODLE3 attack. This is clearly bad for a bank!? Or is it? How likely is it that someone will successfully execute this attack, which requires the attacker to have the ability to intercept and modify the data transmitted. And compare this likelihood with how likely is it that someone will need to access the bank website from an old XP (pre-SP3) machine only supporting SSLv3? The second seems more likely to me.4
Okay, you say, but won’t keeping SSLv3 around make everyone vulnerable because of downgrade attacks? If that were the case, the risk calculation would be different. But luckily, we have TLS_FALLBACK_SCSV to avoid that. TLS_FALLBACK_SCSV ensures that modern client and browser won’t risk being fooled to downgrade its encryption.

Conclusion

So to wrap things up, don’t stare blindly at the rating or certification. A site with A++ is more secure than one with a C rating. But if you (or someone less fortunate) can’t access the site when they need it, it will be a pretty useless site. Personally, from now on, unless the site needs 5 absolute security, all my projects will optimise for compatibility rather than getting an A++. After all, it is much more likely someone will try using it with a Windows XP or old Smart-TV compared to someone MITM-ing that person at that moment.

Disclaimer

Please note though, don’t read this as an argument against doing things securely as default and following best practices. Rather it is just some thoughts on this specific issue of TLS and SSL configurations. If you break with best practice, make sure you understand the reason why it’s best practice to begin with and what risks or weaknesses you introduce by not following them.


  1. I 100% support secure defaults, make it hard to do the wrong thing. [return]
  2. A favourite hobby of some people in the security community is to publicly shame banks or websites for not getting a great grade in the Qualys SSL test. Here is an example from Troy Hunt [return]
  3. SSLv3, not to be confused with the POODLE attacks against some weak TLS implementations. [return]
  4. Also there are mitigations which you should of course implement unless it breaks more than it fixes. [return]
  5. in some cases, like highly sensitive data or targeted users the risk calculation will be different, it might be better for a user not to be able to use the site rather than risk some known (or unknown) attack. [return]

Sandboxed rsync/sftp/scp for secure file uploads

published on

I needed to have someone transfer some files to me securely. But I had a few requirements

  • no third party (e.g. dropbox)
  • handle +150 GiB of files
  • transfer files to a publicly available linux server
  • don’t give access to the destination server
  • the sender only had standard linux utilities (specifically rsync)

Previously I have used locked-down ssh-keys and force-command. Both are good solutions.

This time I ended up using a small sandboxed ssh environment in a docker container with a mounted folder. The benefit compared to internal-sftp is that it gives the sender some flexibility with how he/she wants to transfer the files, scp, sftp and specifically rsync all work.

Warning: Docker containers are not secure sandboxes. The uploader can (by design) upload anything and has shell access so he/she can upload and execute any executable. Any kernel or docker vulnerability could lead to an escape from the docker image. Don’t use this unless you trust the uploader.

In this case, I found a docker-image made specifically for a locked down ssh/scp/rsync environment.

How-To

First create a folder, for example named upload in the directly where you want to upload files, then run and remember to change <USER> to and <PASSWORD> to something else

docker run --rm -it \
  --name docker_ssh --hostname ssh \
  -c 128 -m 256m \
  -e PGID=1000 -e PUID=1000 \
	-p 64822:64822 \
  -v $PWD/upload:/home/<USER> -v $PWD:/etc/ssh \
  -e CNTUSER=<USER>\
  -e CNTPASS=<CHANGEME> \
  -e ROOTPASS=$(openssl rand -base64 12) \
  woahbase/alpine-ssh:x86_64 \
/bin/bash

And then get uploading!

For example,

scp -P 64822 test3.sh <USER>@<SERVER>:~/

or

rsync -e "ssh -p 64822" ./ <USER>@<SERVER>:~/

Reduce (doom)scrolling with NextDNS

published on

One thing which can make you happier and sleep better is doing less (doom)scrolling in the late evening.

Convincing myself to stop (doom)scrolling late in the evening is hard, I’m tired and the dopamine rushes from seeing something slightly entertaining or interesting has kept me up too late many times.

I’ve tried or investigated quite a few different tools and solutions1 to help me break this bad habit.

Now I finally found something which works for me (at the time of writing this). DNS based “parental control” using nextdns.io. This works for me because it’s kind of annoying to change the DNS, and I anyways use NextDNS so it’s not yet another software. Also it also works on the phone, which is the main location of doom scrolling.

If you are not familiar with nextdns.io, it is, in essence it’s a DNS service, with lots of extras. You could call it a cloud version of Pi-Hole. If you don’t know what DNS or Pi-Hole is, this solution is probably not for you. It’s quite technical and might cause some confusing and hard to debug issues.

How-To

First sign up on https://nextdns.io and follow their instructions to enable it. It’s free2.

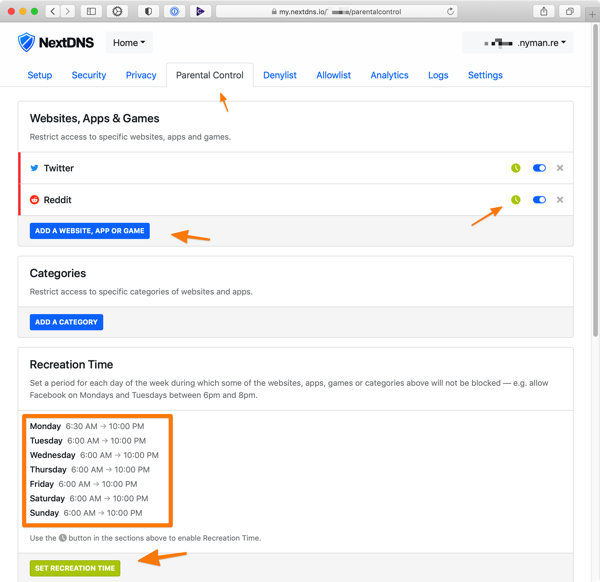
Then go to Parental Control and set up the recreation time to for example 7:00-22:00 every day and add whatever websites or apps to the list of restricted apps. Then click the small click icon to enable the time limit for that app/site.

nextdns screenshot

And then enjoy twitter stopping working roughly at 22:00.

Beware though, DNS based blocking might cause things to misbehave in unexpected ways. And it might not work right away or it might not work at all because of how DNS is cached.

But it works fine for my purpose, generally twitter and reddit both stop working around 22.


  1. If you are a iPhone user I recommend checking out Screen Time, it might be enough for you. [return]
  2. and their privacy policy for the free version looks good but if you like it I recommend supporting it. It’s cheap and your DNS provider will collect such a lot of information about you it’s important that they have a better way to pay the bills than selling your data.) [return]

(Ab)using Slack to detect interesting 1Password events

published on

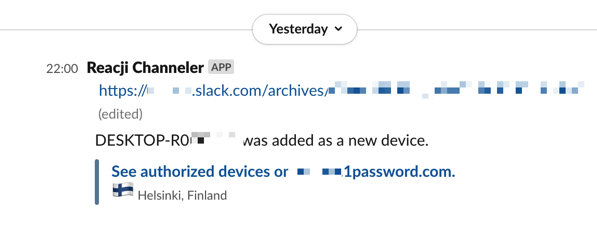
picture of 1password notification in slack

If you use 1Password Business in your organisation, you might be aware that you can get notifications and alerts for various events pushed to your Slack1.

This is quite useful, but I found the notification quickly get overwhelmingly noisy because a notification is generated for every time anyone unlocks 1Password.

This is too bad, because mixed in the notification spam about unlock’s are notifications for when someone logs in from a new device or adds a new trusted device.2 To fix this, I did a little hack.

It consists of two parts, first a go-bot slacker, second the reacji which is a slack app that automatically copies messages with certain emoji to another channel.

The idea is that the slack-bot watches #security-spam for messages that contains “was added as a new device”. When it sees a message that matches this, it will add a 🔏 emoji to the message, and reacji will then copy this to #security-notifications.

You can view a minimal go-bot sample here, figuring out how to install reacji and how to get and configure a bot-token is outside the scope of this post. There are lots of good guides on how to do that available. Just remember to keep the slack-bot permissions to a minimal.

Using these two parts, you can now mute the #security-spam in Slack and stay on top of when any team members or someone more malicious logs in to 1Password.


  1. support.1password.com/slack/ [return]
  2. I tried reaching out to 1Password to see if it was possible to separate these, but their response was that currently it is not possible. [return]

Using TouchID as Yubikey

published on

U2F and Webauthn are the two most exciting developments in web authentication in the last 20 years.

The most common way to use it is with a hardware dongle like Yubikey, which I never got around doing. Instead, I relied on TOTP for my 2-factor authentication.

That was until I found SoftU2F and combined it with Safari-FIDO-U2F to get it working with Safari, which worked, most of the time.

With the release of Safari 14, Apple finally brought proper WebAuthN support to Safari1.

So now, you can quite easily get this experience without any additional hardware.

All you have to do is get the latest SoftU2F.pkg and install it.

Now you have two options; you can let SoftU2F store the key materials in your keychain, which is the default and where you will authenticate by approving or rejecting with a notification.

Safari Yubico demo website 2020 11 12 155020

Or you can use the slightly hidden option, and store the key in the Secure Enclave Processor (SEP), aka the TouchID. But be warned, while the keychain can be backed up and transferred, the SEP can’t2. So make sure you have backup authentication methods for when your Mac decides to stop working.

Safari WebAuthn io 2020 11 12 155140

To use the SEP, you need to run the following command /Applications/SoftU2F.app/Contents/MacOS/SoftU2F --enable-sep You can find more documentation about the SEP implementation in the pull request

All done!

Now you can enjoy having your own built-in FIDO2 key.


  1. While deprecating most extensions but that’s another story… [return]
  2. As far as I know [return]

Introducing PISS, a PHP KISS static page generator

published on

There are lots of static page generators, I personally used Hugo and there like 100 others. But I had a project where I wanted something even simpler, and had a few requirements. I wanted to

  1. Write raw HTML/CSS
  2. Update things in one place only (e.g. don’t copy paste the menu to each html file).

For 1, you don’t need anything other than an editor. 2 is where you need something more than HTML.

I recently came across a project that promised to do more or less exactly what I wanted, xm

But it was written in node/javascript, so I went to look for something else.1

After not finding anything similar, I decided to to do it myself in the 4th most dislike programming language, PHP.

PHP is ubiquitous on Linux servers, and it’s great at generating HTML. The downside for using it as a static page generator is… that it’s not static.

Each time you request a .php page, php will compile and interpret the code and return the output.

The first and obvious solution is to just store the output as html, and you turned it in to a static page generator. Like so

php page.php > page.html

This might get tedious though, and although you can just do a build system which does it, I got curious if it would be possible to do it “on-demand”.

And as a challenge to myself, I wanted to see if it would be possible if I could make it small enough to fit in a tweet2 and without any other dependencies than PHP.

And without further ado, I present to you,

PHP keep It Stupid Simple, in short PISS.

<?php
ob_start(
    function($output) {
        $t = substr(__FILE__, 0, -4) . '.html';
        ($f = fopen($t, 'w')) || header("HTTP/1.1 500") && exit(1);
        fwrite($f, $output);
        header("Location: " . substr($_SERVER['REQUEST_URI'], 0, -4 ) . ".html");
    }
);
?>

Because this is a Real-Serious-Project™ it’s available on GitHub with an issue tracker and all other features that a Real-Serious-Project™ needs.


  1. Mostly because I am not familiar with node/js, but also because xm had 125 dependencies so it failed my requirement of keeping it simple. [return]
  2. The modern variant of 280 characters, not 140, I’m not that good at this. [return]

Initial thoughts on micro.blog and why you need a domain

published on

Domains and owning your content

This page is currently hosted on micro.blog under a custom domain. Hosting things on your own domain is the absolutely most important part of owning and controlling your content and web presence.

If you have one thing you take away from this post, that is it. (Assuming you want your content to stay around). You need a domain.

Luckily there is a wide range of top domains available nowadays, for a wide range of prices, so you should be able to find something you like. A little tip though when picking a top-level (the .com/.re part), be wary of promotions. It is often possible to get a domain on a sale for as little as $1, but that price usually applies only to the first year. So when picking a domain, even if you don’t pay upfront for ten years, at least check the price for ten years, so you have an idea of the recurring cost will be in the future.

There is a multitude of domain providers; the one I use is Gandi.net, while not the cheapest they have served me well. They are EU (France) based and seem to make an effort to be nice. If you decide to go with them, you can use this referral to get 20% off and give me a small kickback.

Hosted vs. self-hosting

Now back to the topic, micro.blog. While I am perfectly capable of hosting my blog on my own server, I don’t think I want to. And I believe paid-hosted services is the best option for most.

Self-hosting, anything, always has its pros and cons. On the pro side, you learn a lot, and you maintain full control over it. On the downside, it takes time and effort to learn it, and you need to continuously spend time maintaining and watching it to make sure it stays up. Spending time on keeping it up to date is especially important; otherwise, things can quickly end up like the security-hellscape that is self-hosted WordPress blogs and sites.

So I decided that for now, I will try to use the micro.blog hosting until I run into some roadblock. An additional reason is that I like what @manton and his crew are doing, and I want to support them. So my life becomes easier, and I support a good cause, win-win.

Federation

One of the reasons I picked Micro.blog, was for the built-in Twitter and Linked-in federation. But after posting a few things, I am not sure I want to use it. It’s one of these features, which sounds nice until you use it. It made me realise that maybe I don’t want to post the same thing on every platform.

I am going to think about this and maybe ping @manton to see if there are any plans to make it possible to configure federation for each individual post.

I’ll write more thoughts after I’ve used it for some time.

Categories

Adblocking (1)

Css (1)

Distractions (1)

Gpt (9)

Gptaoc2022 (9)

Linux (1)

Llm (9)

Microblog (2)

Php (1)

Rants (1)

Repair (1)

Security (5)

Servers (3)

Spreadsheets (1)

Sysadmin (3)

Tech (24)

Web (7)